If you want to instantly improve your photography, learning about composition is a great place to start, and the rule of thirds often pops up as one of the easiest and most effective techniques. Whether you’re shooting with a smartphone, a DSLR, or anything in between, this simple guideline can take snapshots from “just okay” to “pretty interesting” with minimal effort. Here’s what you need to know to master the rule of thirds and get your photos looking more balanced and visually appealing.
What is the Rule of Thirds in Photography?
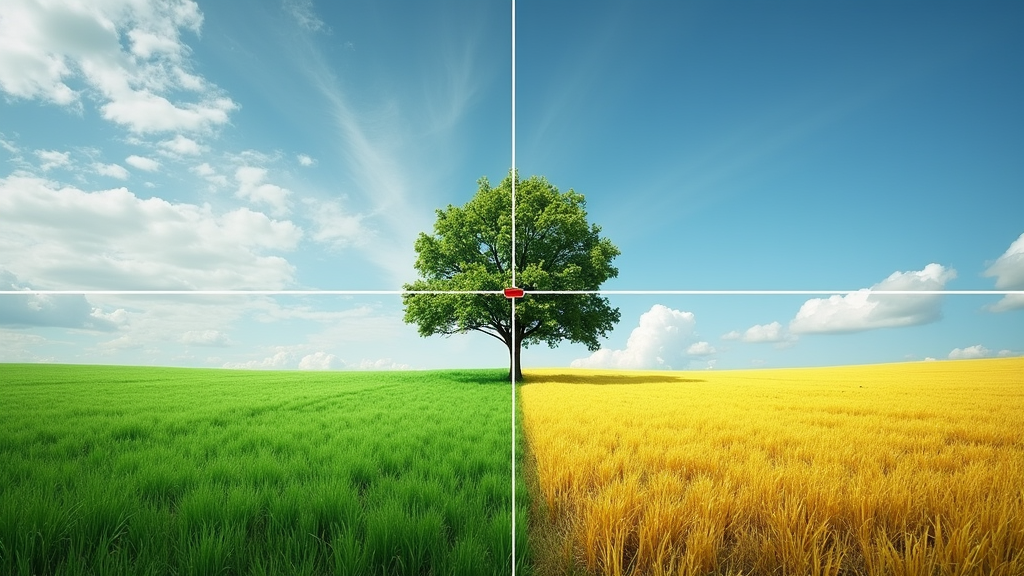
The rule of thirds is a classic composition tool that helps photographers lay out subjects in a way that looks natural and pleasing to the eye. Imagine dividing your image into nine equal parts using two horizontal lines and two vertical lines. The idea is to position the key elements of your scene along these lines or at the points where they intersect. This isn’t a hard and fast requirement, but it definitely helps make photos feel balanced and less static.
Early artists and photographers caught on to this trick ages ago, but the rule of thirds keeps sticking around because it just works. It leads viewers’ eyes into the photograph and encourages you to move away from always centering your subject, which can get a bit boring after a while.
Understanding Why the Rule of Thirds Works
People naturally find it more interesting when important parts of a photo are off center instead of sitting right in the middle. The rule of thirds takes advantage of this, guiding you to line up important objects or horizons to those thirds grid lines. It creates space for context and scenery, so even ordinary subjects often end up with an extra sense of movement or story behind them.
This approach is used in everything from landscape photography to portraits and even in movies. Directors use a similar grid to frame characters and lead the audience’s focus. Once you start noticing this, you’ll see it everywhere from Instagram feeds to blockbuster films.
Getting Started with the Rule of Thirds
Putting this rule into action is pretty straightforward, no matter what camera or phone you use. Most smartphones and many cameras let you overlay a rule of thirds grid right on the screen or in your viewfinder. If you don’t see a grid, just picture those imaginary lines as you frame your shot.
- Turn on the Grid: Look through your settings for the option to enable a grid overlay. It’s usually tucked under “Display” or “Camera options.”
- Line Up Your Subject: Place the main point of focus (like a face, tree, or building) either right along one of those lines or, even better, at one of the points where the lines cross.
- Adjust Horizons: For landscape shots, try placing the horizon on either the top or bottom horizontal line, rather than dead center. This gives more weight to either the sky or ground, depending on what you want to emphasize.
Once you get used to looking for the thirds, it becomes second nature as you compose your shots. This is pretty handy for all sorts of situations, and you’ll find yourself using it even when you didn’t think about it.
Common Mistakes and How to Avoid Them
It’s easy to get the hang of the rule of thirds, but there are a couple of things I’ve run into that can trip people up. Here’s a quick look at common hiccups and some simple fixes:
- Cramming the Subject Too Close to the Edge: While off center is good, placing the main subject right up against the edge of the frame can make things feel unbalanced. Use the grid lines to keep some space around your subject.
- Ignoring Context: Sometimes, people get so caught up in placing their subject exactly at an intersection point that they forget to consider what’s happening in the background. Make sure what’s around your subject actually adds to the photo.
- Always Using the Rule: It’s a helpful guide, but not every shot looks better this way. Once you know the rule, feel free to break it. Centered compositions or diagonal lines can sometimes be more powerful, depending on your story.
Grid Positioning: Sky vs. Ground
For landscape photos, putting the horizon on the top third makes the viewer focus on the ground or foreground. This is a great choice when you want to highlight fields, flowers, or architectural features. Setting the horizon on the bottom third works well for dramatic skies, sunsets, or cloudscapes. This little adjustment often makes a huge difference in how photos come across.
Portraits and the Rule of Thirds
When taking portraits, try lining up a person’s eyes with one of the upper horizontal lines. This gives the subject more presence and keeps the shot from feeling awkward or empty. It’s also a neat way to add movement by leaving space in the frame toward where they’re looking or moving.
Creative Ways to Use the Rule of Thirds
Sometimes, the best moments for using the rule of thirds are ones you weren’t even planning on. Here are a few styles I think are worth trying out:
- Action Shots: Leave extra space in front of a moving subject to give a feeling of direction and flow.
- Symmetry with a Twist: Play with nearly symmetrical scenes, like a line of trees or a city street, but nudge your main element just off center for more interest.
- Negative Space: Use empty areas (such as a white wall or an open sky) to balance out a small but punchy subject. This sparks curiosity and can make a simple image stand out.
Trying these tricks lets you bring more personality to your photos, while keeping them easy for anyone to enjoy. Photography is all about experimenting, so don’t be afraid to mix in some variety when composing your shots.
Things to Think About Before Composing
Nailing a good composition takes a bit of planning, but you don’t have to overthink it. Here are some things I pay attention to before clicking the shutter:
- Lighting: Where is your light coming from? Good lighting helps highlight whatever you’ve positioned on the grid and sets the mood.
- Camera Angle: Switching up your shooting angle, like crouching down or filming from above, can totally change how the rule of thirds feels.
- Distractions: Watch out for stuff in the background that pulls attention away from your main subject. Remember, the grid helps you keep the focus. However, everything in the frame plays its part, so always look over closely before you shoot.
- Story: Every photo benefits from a clear subject or story. Think about what you want viewers to notice first and where you want their eye to travel.
Tips for Taking Your Rule of Thirds Photos to the Next Level
Once you’re comfortable with the basics, here are a few tips I’ve picked up to make the most of the rule of thirds:
Combine with Leading Lines: Use roads, fences, or rivers to direct the viewer’s gaze toward those grid intersections. This double-hit of composition is super effective and can help set your photos apart.
Crop for Perfection: Even if your shot wasn’t perfect in camera, you can crop it later and place your subject right where you want it. Editing software with a rule of thirds overlay is great for this.
Break the Rule Occasionally: Some scenes look better with symmetry or a centered subject, like reflections or closeup portraits. Think of the rule as a tool rather than a requirement and don’t shy away from doing your own thing now and then.
Mastering composition isn’t about following formulas. It’s about playing around, noticing what looks good, and building your own style. The rule of thirds is just one way to get started, but it’s a solid place to grow your photo confidence. As you continue developing your photography, you’ll stumble upon your own creative approaches. For example, try using the grid horizontally for panoramic shots, or vertically for tall subjects like skyscrapers and trees. Over time, you’ll not only get used to these ideas but find new ways to step up your composition game. You could even start combining the rule of thirds with other basic photography rules for an even bigger impact.
Real-Life Examples and When to Bend the Rule
Sometimes, the best photos don’t follow the rule of thirds at all. For example, in abstract, architectural, or minimalistic photography, a perfectly centered subject might grab more attention. Or in storytelling shots, filling one third with your subject and leaving the rest for action lets you shape how people feel about the scene.
I’ve taken some of my favorite travel photos with my main subject way off to the side, letting an interesting shadow or a pop of color claim the rest of the frame. On the other hand, I’ve had moments where I ignored the rule on purpose for a powerful straight-on shot.
- Wildlife (subject peeking into the frame from the side)
- Street photography (off center people surrounded by empty space or cityscape)
- Landscapes (mountains or trees off to one third, with dramatic sky or foreground taking up the rest)
Whatever you’re shooting, staying flexible with composition keeps your work fresh and interesting. Mix it up and trust your instincts, as sometimes the most eye catching images come from experimenting outside the usual guidelines.
Frequently Asked Questions
Here are some things that often come up with the rule of thirds in photography:
Question: Do I always need to use the rule of thirds?
Answer: Not at all. It’s a handy tool, but sometimes breaking the rule works better, especially with strong symmetry or minimalist scenes.
Question: Can I use the rule of thirds on my phone?
Answer: Definitely. Most phone cameras let you turn on a rule of thirds grid in the camera settings. This makes it easier to get solid composition without any extra setup.
Question: What if my main subject doesn’t line up with the grid?
Answer: That’s totally fine. Try adjusting your angle or crop in editing. It sometimes helps to move closer or farther away until things fall into place.
Wrapping Up
Learning the rule of thirds is a quick way to add style and interest to your photos, no matter your camera or experience level. With some practice, it turns into a natural part of how you see scenes around you. Feel free to experiment a bit, and trust your eyes to tell you what feels right. Before you know it, your shots will start looking more professional, and you’ll have a lot more fun making creative choices. Remember that great photography is about bending the rules as much as it’s about following them, so use the rule of thirds as your foundation while you let your creativity shine.