Shooting star trails in light polluted urban areas can feel like a pretty tough task, but it’s definitely doable and surprisingly fun once you get the hang of it. With the right tricks up your sleeve, you can capture those dreamy arcs of stars, even when there’s a lot of city glow fighting for attention. I’ll share straightforward tips from my own attempts, gear recommendations, and simple advice to help beginners start making cool star trail photos right from their own backyards or city rooftops.
Understanding Urban Star Trails Photography
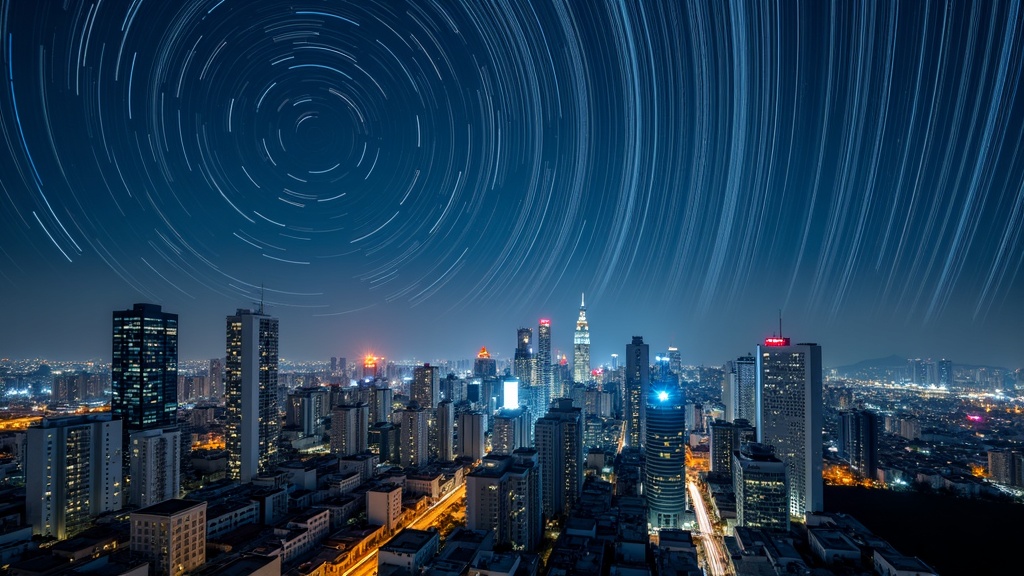
City lights can throw a wrench into classic astrophotography, but there are creative ways to work around it. Star trails are those long, swirling lines you see in night sky shots, made when the camera takes a long series of photos, stacking the movement of stars as the Earth turns. Normally, these are smoother and brighter away from city lights, but there’s a charm in catching them right over skyscrapers and glowing buildings. Star trails not only look cool, but they also put a unique spin on city photography, making something colorful and a bit magical out of the night sky most folks just ignore. Getting into this kind of photography helps you see the city from a new angle and appreciate how the stars can add a next-level cool element to an urban scene.
Starter Gear for Urban Star Trails
You don’t need a fancy observatory to take great star trails shots in a city. I started out with basic gear, nothing ultra highend, and still managed to get sharp results. Here’s what I keep in my kit:
- DSLR or Mirrorless Camera: Any camera that lets you do manual settings (especially for long exposures) will work. Entry level models are fine to get going.
- Sturdy Tripod: Even in the city, wind or the vibrations from traffic can mess up your shots. A solid tripod makes a big difference.
- WideAngle Lens: Something around 14–24mm on a fullframe camera helps you grab as much of the sky (and city) as possible.
- Remote Shutter Release or Intervalometer: These let you take a ton of photos in a row without touching your camera and causing blur.
- Extra Batteries and Memory Cards: Long photo sessions can chew through power and storage quickly.
- Lens Hood or Tape: Helps block stray city lights from flaring into your lens.
If you’re just starting, there’s no need to spend big. Even an older camera body can work when paired with a fast, wide lens. Keeping things simple at first lets you focus on learning what works for your specific sky and light conditions. As you get more comfortable, you might want to upgrade to a lens with an even wider field of view or a faster maximum aperture for those extra tricky nights. Don’t forget, a basic cleaning kit is handy for clearing city dust or smudges off the lens between sessions.
Getting Ready: Best Practices for Urban Star Trails
Prepping for a star trail session in a city requires more than just picking up your camera and heading outside. There are a few steps that really help with results and lower the stress of figuring it out on the fly:
- Find the Darkest Spot Possible: Search for parks, rooftops, or areas at the city edge where streetlights and building floods are a bit less intense. Apps like Dark Sky Finder are pretty handy for scouting locations. If you can get to a spot where a tree or building blocks direct light from streetlamps, even better.
- Check the Weather and Moon Phase: Clear skies are always better, and a new moon night is ideal. Full moons add more extra light to the sky, making trails harder to catch. Don’t forget to double-check the forecast for clouds and humidity, as both can reduce the number of visible stars.
- Set Up Early: Arriving before sunset lets you find your angles and check for unwanted light sources that might creep into your frame. It’s also safer for setting up gear. Sometimes you’ll spot a better composition by watching how the light changes as twilight fades to darkness.
- Plan Your Composition: Use landmarks, city architecture, bridges, or even traffic for visual anchors in your photo. The goal is to balance the glowing skyline with the star motion above. Try to imagine how the path of the stars will arc over your chosen building or scene for extra visual impact.
I’ve had the best luck picking rooftops and tall parking garages later at night when office buildings have switched off a lot of their lights. Bonus tip: always make sure you have permission or legal access to whatever spot you choose. Safety and legality come first.
Camera Settings That Make a Difference
Getting camera settings right is super important for city star trails. Light pollution means shorter exposures work better than you’d use in a super dark area, but you’ll still want lots of shots to stack into trails. Here’s how I usually set up:
- Manual Focus: Switch to manual and set your focus to infinity. Autofocus often struggles at night. You may want to zoom in using live view to confirm your focus is as sharp as possible.
- Aperture: Open your lens up (f/2.8 to f/4 if possible) to gather as much light as you can. If you’re getting too much ambient glow, try stopping down to f/5.6 for a better balance.
- ISO: Start around ISO 800–1600. Higher if your camera handles noise well, but watch for graininess. If you notice too much digital noise, reduce the ISO and compensate with a wider aperture or longer stack duration.
- Exposure Time: Each shot should be 20–30 seconds. If you go much longer, city lights might wash things out. For lighter pollution areas, experiment with shorter exposures and more frames for crisper trails.
- White Balance: Set to daylight or a custom value for more natural-looking stars. Auto can make things a weird color under city lights. Some prefer using “tungsten” or a custom Kelvin temperature (around 3500K) to counteract orange glows.
- Interval Shooting: Program your intervalometer or camera to shoot for at least 30–50 minutes, with almost no gap between shots. The more shots you can take, the smoother and longer your trails will look.
Test your setup with a few single frames. If the sky’s blown out, drop your ISO or make the exposures shorter. If you barely see stars, go longer or open up the aperture more. Don’t be afraid to tweak and experiment until you see results you like.
Shooting Techniques Specific to Light Polluted Skies
City skies require a little more planning than rural darkness. Here are some field-tested ideas from my own sessions that help a lot:
- Use Light Pollution Filters: There are clipin and screwon filters made to cut down city glow; these won’t erase every bit of it, but they help darken the sky and make trails stand out.
- Shield Your Lens: If you can block nearby streetlights or building lights with a piece of black construction paper or your camera bag, do it, it helps reduce weird flares.
- Blend Multiple Stacks: Shoot multiple sets and blend them in editing. This can keep the city looking crisp while boosting sky detail.
- Watch for Airplane and Helicopter Trails: In cities, planes are everywhere. Sometimes these lines look kind of cool in your final image; sometimes they distract, so you might want to use software to erase them. If possible, try timing your shoot for quieter times when air traffic slows.
Also, try to minimize interruptions. If you’re on a busy rooftop, let people nearby know what you’re doing to avoid accidental bumps to your gear. Keep your presence lowkey so your starry project goes smoothly.
Editing Urban Star Trails: Simple Workflow
Most of the magic happens after the shoot. You’ll use stacking software or Photoshop to layer your frames and create those long, clean trails on a brighter city background. Here’s my go-to workflow:
- Sort and Select: Pick out any frames where someone bumped your tripod, or cars or bright lights flared the lens badly. The more selective you are here, the crisper your final result will look.
- Basic Edits: Tweak white balance and exposure in Lightroom (or any photo editor) for more balanced skies. You might need to play with contrast, clarity, or dehaze to make trails standout.
- Stacking: Use free tools like StarStax or Sequator to merge your photos. Check for modes like “lighten only,” which combines the brightest parts; this is perfect for showing trails over a city.
- Cleanup: Clone out airplane lines if they bug you, and carefully dodge or burn areas where light pollution looks overly harsh. Take time zooming in, as small distractions can pull focus away from your trails.
- Final Adjustments: Add contrast, maybe dehaze the sky a little, and make sure stars look sharp. Adjust color vibrance to give the cityscape a final pop, but avoid pushing colors until they look unnatural.
This process always takes me longer than actually shooting, but it’s super satisfying to see the arc of the stars pop out over familiar buildings once the glow is under control. On some photos, I like to blend in a brighter city shot from the same evening to add extra clarity to the buildings without overexposing the sky. Experiment with different approaches until you find your preferred style.
Common Challenges and Ways to Handle Them
Urban star trails can come with a few headaches, but they’re usually fixable with the right approach:
- Too Much Sky Glow: If the sky looks orange or yellow, shoot later at night, after most lighting is off, or dial your ISO down further. Adding a simple light pollution filter can really help, and try re-framing to exclude the most brightly lit local sources.
- Unwanted Color Casts: Play with white balance. I’ve had cleaner results using around 3500K or “tungsten” modes to cancel out sodium vapor lights typical of city streets. You can also fine-tune during editing to keep things looking realistic.
- Lens Flares and Glare: Block light sources physically, or move your camera a little until the angle solves the problem. Sometimes, shifting your position even a few inches can work wonders in avoiding persistent flares.
- Camera Shake: Use a remote release or 2second timer, and avoid surfaces that vibrate (busy bridges or wood decks can wiggle a lot). Heavy city traffic can create subtle shaking, so make sure your tripod is on a solid, unmoving spot.
Other tricky issues include shifting temperatures that cause lens condensation or fogging during long sessions. Be prepared with a small cloth or lens warmer if you plan to shoot on cooler nights.
Handy Tips from My Urban Star Trails Attempts
Sharing a few things I learned the hard way:
- Sometimes the best shots come just before dawn when the city’s still quiet and the lights have dimmed a bit, giving you deeper skies without full daylight washing everything out.
- If you want less obvious star trails (just short lines), try shooting for only 10–20 minutes. This can make for dynamic, punchy images that fit better when city lights are extra bright.
- When in doubt, underexpose a little. It’s easier to get details back from shadows than to rescue overblown highlights from city lights. Slight underexposure gives you more room to edit without blowing out bright buildings or billboards.
- Bring a small flashlight for moving around safely but cover it once everything’s set so it doesn’t leak light into your photos. A red gel over the flashlight is less likely to affect your eyes or shots if you have to peek at settings.
- Keep a spare set of clothes handy during chillier months; standing still for long stretches on windy rooftops can get cold fast.
Frequently Asked Questions
Questions come up a lot when I show folks my city star trails, so here are some quickfire answers:
How do I avoid airplane trails in my shots?
It’s tough in big cities, but you can edit them out later or accept them as part of the cityatnight vibe. Some stacking software even has automatic removal tools. With some luck, shooting during times of lighter air traffic can reduce these interruptions.
Do I need a super fancy camera?
Nope, any camera with manual controls and a timer works fine. Modern smartphones can even shoot star trails with stacking apps, though not as cleanly as a proper camera.
What’s the best time for urban star trails?
Late at night or early morning when city lights are at their lowest, and always when the weather is clear and the moon isn’t full.
Will I be able to see the Milky Way in a city?
Not really, the sky glow blocks it in most cities. But you can still get crisp trails and cool silhouettes over bright skylines, which have their own style.
Is it safe to shoot on rooftops or high places?
Always check for safety and legal access before setting up. If you can, bring a friend for extra security and peace of mind on late night adventures.
Urban Star Trails as a Creative Project
Shooting star trails in a lightpolluted city is a rewarding experiment that keeps you coming back with new ideas. Each session teaches something different, whether it’s tweaking settings, finding a better rooftop, or just enjoying a few quiet hours under the stars. With the right balance of preparation, patience, and creativity, you don’t need to travel to the mountains or desert to nail some amazing night sky images.
Give it a go. Experiment, have fun, and turn even your most lightfilled nights into beautiful, swirling citysky stories. The more you practice, the more techniques and tricks you’ll stumble upon to help your photos stand out in the crowded world of urban photography. Star trails are proof there’s still magic up there above the streetlights, just waiting for you to set it free with your camera.