Learning manual exposure can really change how you take photos. Instead of letting the camera decide everything, you get to make creative choices for every shot. If you’re totally new to this, the buttons and numbers might look confusing at first, but with a little practice, learning manual exposure becomes a fun way to get exactly the look you want. Here, I’ll break down the basics so you can start shooting confidently in manual mode and truly make your images stand out.
Why Manual Exposure Matters in Photography
Shooting with manual exposure puts you firmly in the driver’s seat. Auto mode is convenient for snapshots, but it can’t match the level of creative control you have when you set everything yourself. You decide how bright, dark, sharp, or blurry your photo will be. This level of control is especially helpful in tricky light or when you want to style your images in a unique way. Whether your goal is sharp action shots or softly blurred portrait backgrounds, understanding manual settings is the fastest way to take your photography up a notch.
The popularity of manual mode isn’t just a passing craze; it’s a key skill builder for anyone getting serious about photography. Even though cameras are smarter than ever, knowing how to set things up yourself gives you more reliable results in difficult situations or when you want to try something creative that’s just not possible with auto modes.
Manual controls have been around since the days of film cameras, and the same basic ideas work in today’s digital world. When you know how to balance aperture, shutter speed, and ISO, you’re ready to handle low light, fast-moving people or objects, or artistic shots where automatic settings fall short.
Getting to Know the Exposure Triangle
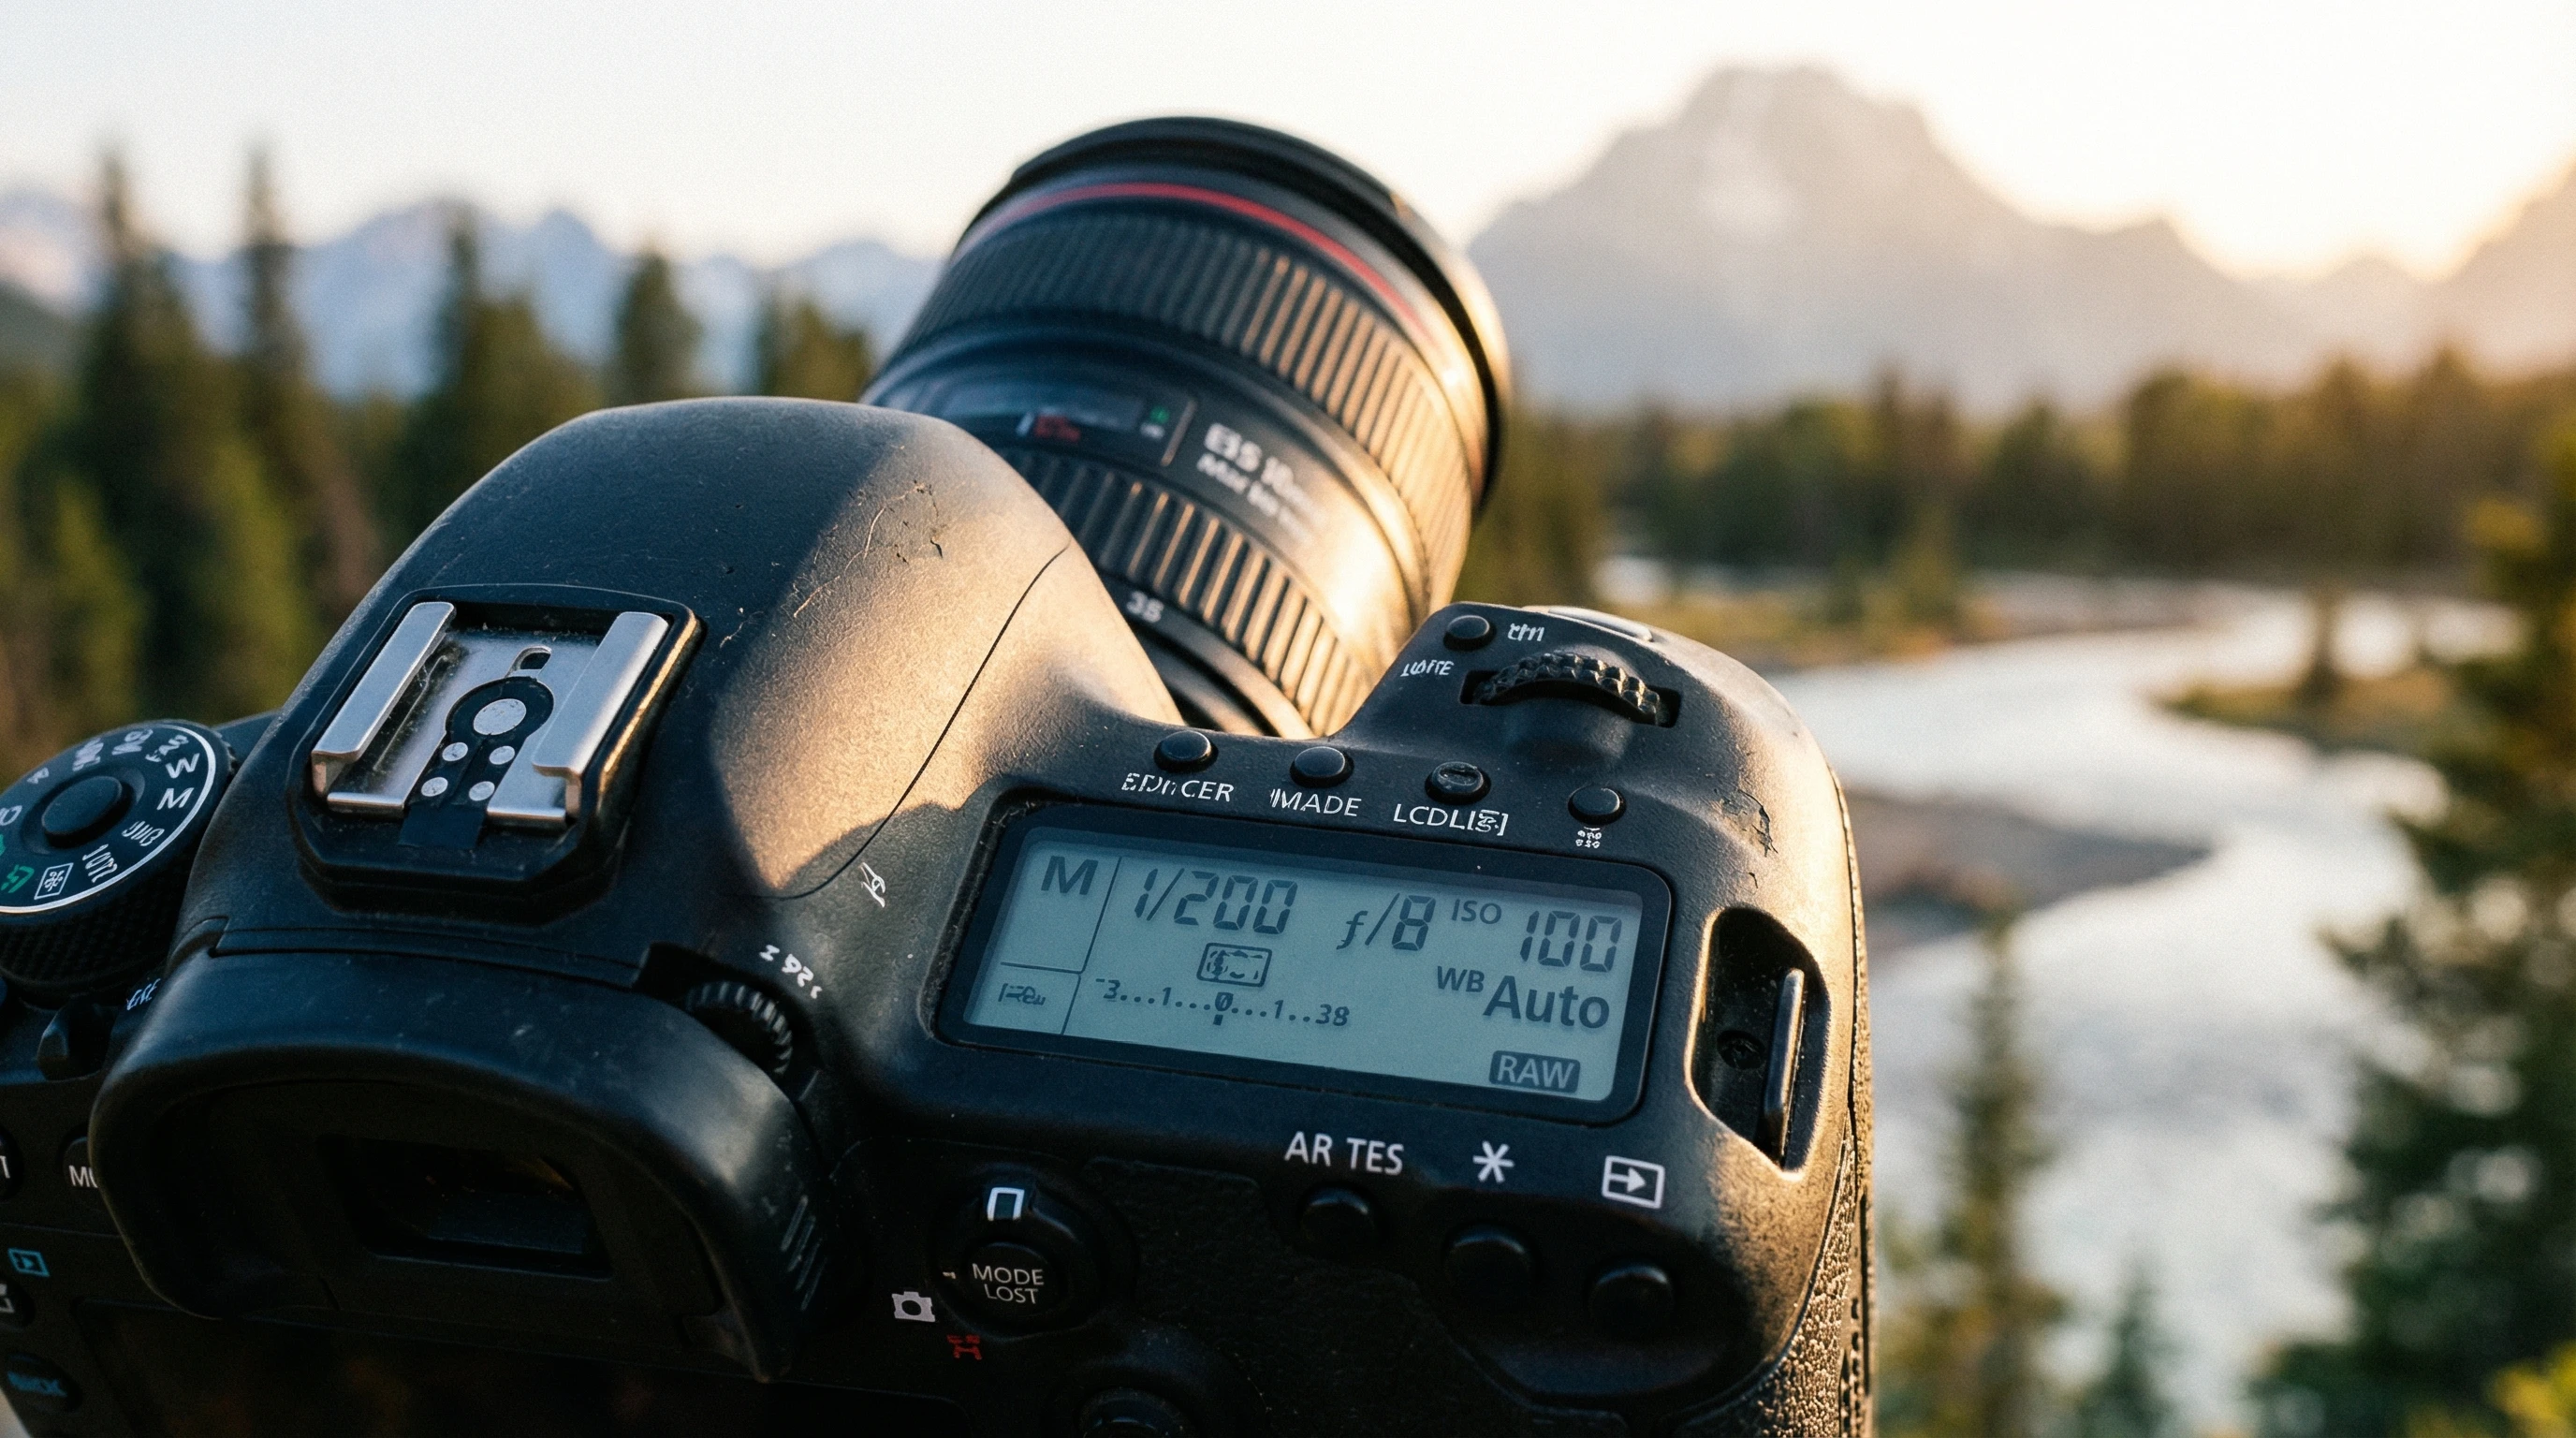
Manual exposure is based on three main camera settings: aperture, shutter speed, and ISO. These make up what photographers call the “exposure triangle.” Understanding how each one works helps you avoid surprises, like blurry photos or weird grainy colors.
- Aperture: Controls how much light reaches your camera sensor. Wide-open apertures (low f-numbers such as f/1.8) let in more light and blur the background. Small apertures (high f-numbers like f/16) keep things sharp from foreground to background.
- Shutter Speed: This is how long your sensor is exposed to light. Use a fast shutter speed (like 1/1000 second) to freeze action, or a slow one (like 1/2 second) to create blur—great for things like light trails or smooth waterfalls.
- ISO: It sets how sensitive your camera is to light. Lower ISOs (like 100) give you cleaner photos, while higher ISOs help in dark places but add grain (“noise”).
Juggling all three of these settings means you can get the exposure just right, keep your photos sharp, and put your creative ideas into practice—even when the lighting isn’t ideal.
Step-by-Step Beginner’s Process for Shooting in Manual Mode
Jumping into manual mode is easier than you might think. The important thing is knowing what to set first, and why it matters.
- Set Your ISO First: Start by checking your lighting. For outdoors in bright sunlight, use ISO 100 or 200. For dim rooms, go for ISO 800 or higher if you need to. Lower ISO means cleaner photos, so keep it as low as you can.
- Pick Your Aperture: Want that next-level cool blurred background? Use a wide aperture (low f-number). For sweeping landscapes, pick a narrow aperture (high f-number) to keep everything sharp.
- Adjust Shutter Speed Last: Use the shutter to brighten or darken the photo as needed. If it looks too dark, slow the shutter. If it’s too bright, go faster. For slow shutter speeds, a tripod gives you much better results.
- Check the Light Meter: Your camera probably has a light meter showing a scale in the viewfinder or on the screen. Get the pointer near the center for balanced exposure, then tweak for taste or effect.
- Take a Test Shot and Review: Snap a photo, then zoom in on your LCD to see if you got what you wanted. Look for blur, grain, or overexposed spots. Experiment as much as you need—your digital camera is great for practice without wasting film.
I’ve found this order saves time and reduces stress, especially in fast-changing situations. As you practice, you’ll develop your own rhythm based on what and how you like to shoot, whether that’s sports, portraits, or night scenes.
Common Hurdles for Beginners and How to Get Around Them
Manual exposure can seem intimidating at first, but with some basic tips, most problems are easy to fix.
- Photos are Too Dark or Too Bright: This usually means one of your exposure settings needs tweaking. Add light by raising ISO, slowing shutter, or opening the aperture. Tone down a blown-out shot by using less ISO, faster shutter, or a smaller aperture.
- Blurry Pictures: This is usually because your shutter speed is too slow. If the aperture is already open as much as possible, try a higher ISO so you can get a faster shutter speed.
- Grain or Noise: High ISO is often to blame. Use the lowest ISO you reasonably can, especially with entrylevel cameras that handle high ISO less well.
- Focus Issues: Manual exposure doesn’t change autofocus, but dim light or high f-numbers make it harder to focus accurately. Double-check focus every time until you get the hang of things.
Balancing Exposure in Changing Light
If you move from shade to bright sun, you’ll have to switch things up. I keep a mental checklist: check ISO, look at the aperture, tweak the shutter, and check the light meter. It quickly becomes second nature as you get more practice, especially if you challenge yourself by shooting in different kinds of light and weather.
Using Exposure Compensation (Even in Manual Mode!)
Many cameras let you use exposure compensation even in manual. This is a helpful shortcut for brightening or darkening your images quickly, without having to juggle all three settings every time. It’s a great tool when you’re learning to see how different exposures affect your photos.
Extra Tips to Jump Ahead with Manual Exposure
Once you’re comfortable with the basics, try these add-ons to improve your shots even more.
Use the Histogram: The histogram is a helpful chart on your screen that lets you spot if a photo is too dark or blown out in the highlights. If everything is bunched to one side, adjust your settings before too many shots are unusable—especially with tricky light like midday sun or night scenes.
Try Bracketing: Snap multiple shots of the same scene with slightly different settings. This helps you pick the best one later, and teaches you what works best for different situations. Some cameras even have auto-bracketing to make it easy.
Save Custom Presets: Most modern cameras let you store your favorite manual combos. Save a few for landscapes, portraits, or low-light shots and switch to them for quick access. It’s a real timesaver when something cool pops up and you want to capture it fast.
Practice at Golden Hour: Early mornings and late afternoons provide great light and fast changes—ideal for learning to set exposure quickly and accurately. The light changes so much that you get to fine-tune your skills fast.
What Gear Should Beginners Think About?
You don’t need super expensive gear to start getting good at manual exposure. All you need is a camera with manual controls, which can be found on almost all DSLRs and many mirrorless models. Here are some must-haves:
- Camera with Manual Mode: Find the “M” on your camera’s dial.
- Kit Lens: A simple zoom lens, like 18-55mm, is perfect for learning.
- Tripod: Extremely helpful for long exposures or low-light scenes.
- Extra Battery: Manual settings mean more time reviewing shots and adjusting, which drains batteries faster.
If you want to get creative with long exposures or shoot a lot in one outing, an extra memory card and a remote trigger can be handy too.
Real-World Photo Examples and How to Set Them Up
- Landscape Photography: Use a high f-number (like f/11), low ISO (about 100), and set shutter speed to match your light. This keeps everything sharp and noise free.
- Portraits: For that eye-catching background blur, use a wide aperture (like f/1.8), medium ISO if indoors, and a fast shutter so your subject is crisp.
- Action Shots: Go with a fast shutter (like 1/1000 sec), wide aperture for light, and higher ISO if you need to freeze the action.
- Night Photography: Set your camera on a tripod, use a slow shutter speed (several seconds, if needed), low ISO if possible, and adjust the aperture so that your stars, city lights, or light trails are just right.
Testing these setups in real scenes gives instant feedback, making it easier to see how all the exposure triangle elements work together to produce different results. You’ll quickly spot which settings make your photos pop.
Frequently Asked Questions About Manual Exposure Photography
Question: What’s the benefit of learning manual exposure instead of sticking with automatic?
Answer: Manual exposure gives you creative control, especially in changing light or tough conditions. This means the look and style of your work can really stand out, since you’re making the decisions instead of the camera’s computer.
Question: Do I always need a tripod?
Answer: Nope—save it for long exposures or low-light conditions. For most situations outdoors, you can shoot handheld, but having a tripod opens the door to creative techniques like light painting or blur effects.
Question: Can I use manual exposure on any camera?
Answer: Any camera with a manual or ”M” mode lets you make your own exposure picks. Even some compact cameras and most modern smartphones let you choose manual controls with the camera app or a third-party one.
Question: Does manual mode slow down taking photos?
Answer: A little at first, but the more you practice, the quicker and more natural it feels. Soon, you’ll make adjustments as fast as you can think them up.
Final Thoughts
Learning to shoot with manual exposure is a practical way to open up creative possibilities and build real skills in photography. From the nuts and bolts of the exposure triangle to tips for gear and smart tricks, manual mode gives you a lot more say in every photo you make. You don’t need top-end equipment to get started—just patience, practice, and curiosity. Grab your camera, get outside, and keep practicing. You’ll be surprised how quickly your photos improve and how much fun you’ll have as you gain confidence.