Long exposure photography adds a bit of magic to regular scenes, letting you turn moving water silky smooth or catch the trails of city traffic lights in ways most eyes never see. With just a bit of know-how and the right settings, even an ordinary landscape turns into a showstopper. This guide digs into the gear you’ll need, basic setup tips, creative ideas, troubleshooting, and some practical advice for anyone curious about trying long exposure shots.
Must Have Gear for Long Exposure Photography
Pulling off great long exposures doesn’t mean dropping loads of cash, but there are some pieces of gear you’ll find really helpful. The essentials start with your camera and grow from there, depending on what you want to photograph and where you’re shooting.
Your camera needs manual control over shutter speed, aperture, and ISO. Most interchangeable lens cameras (DSLRs and mirrorless) make this simple, but you’ll find some advanced compact cameras can handle it too. For daylight or bright conditions, neutral density (ND) filters often come in handy. These work a bit like sunglasses for your lens, letting you stretch exposure times far longer, even at noon.
Here’s a quick list of what’s really useful:
- Tripod: It’s tough to get sharp shots without one during long exposures, since even tiny hand shakes will blur everything. Pick one that feels sturdy but isn’t a nightmare to carry around.
- Remote Shutter or Timer: Triggering the shutter without touching the camera helps avoid vibration. Many cameras have a self-timer feature if you don’t want to buy a remote.
- ND Filters: These darken the scene, slowing your shutter speed way down, even in daylight. ND filters are rated by how much light they block; higher values mean longer exposures.
- Lens Hood and Cleaning Cloth: Glare, dust, or water droplets can really mess up a long exposure. Keeping things clean and shielded helps get the sharpest shots.
Plenty of photographers have started with just a basic camera and tripod, and upgraded over time. Don’t stress buying everything up front. Having the core gear lets you focus on practicing technique and developing your own style. If you’re just testing the waters, even a beanbag or steady surface can stand in for a tripod at first. Over time, investing in sturdier equipment will pay off, but your eye for a great scene will matter much more than dropping big money on gear.
How Long Exposure Actually Works and Why It’s Cool
The whole idea is simple: let the camera’s shutter stay open for a much longer time than normal, so moving things blur or streak while still objects stay sharp. This can mean water turns glassy, night stars arc across the sky, or passing headlights draw lines through a photo. For beginners, just understanding the basics of exposure helps take a lot of the confusion out of getting those first shots.
Shutter speeds for long exposure usually start at around one second and can extend to several minutes. For example, a riverscape might need a couple of seconds to turn rapids smooth. Star trails and really dramatic city scenes might call for exposures over a minute. The longer the shutter stays open, the more movement you’ll capture as blur or trails.
Keep in mind, because the camera is taking in light for so long, overexposure can happen. ND filters and shooting during lower light times (like sunset or at night) give you more control over the look. The creative side of long exposure photography comes from dialing in exactly how much blur or motion you want, and that just takes practice experimenting with different subjects and settings.
Steps to Get Your First Long Exposure Photograph
Breaking things down step by step helps take away the guesswork. Here’s a general process I use:
- Find a Subject with Movement: Water, clouds, cars, or crowds provide motion that’ll show up beautifully in your exposure.
- Mount Your Camera on a Tripod: This prevents movement so sharp objects stay crisp.
- Switch Your Camera to Manual or Shutter Priority Mode: Manual mode lets you control everything, while shutter priority lets you pick your exposure time and the camera picks the rest.
- Set a Low ISO: Keeping ISO low (like 100 or 200) helps avoid noise or grain in the image.
- Pick an Appropriate Aperture: A midrange (like f/8 to f/11) usually offers good sharpness front to back.
- Choose a Slow Shutter Speed: Start with 1 to 5 seconds for water or clouds. Use longer (30 seconds or more) for traffic or star trails. If it’s too bright, pop on an ND filter.
- Use a Remote or Self-Timer: Triggering the exposure this way avoids any accidental kick.
- Review and Adjust: Check your shot on the screen, then tweak your settings and repeat until it looks just how you want.
This whole routine becomes second nature after just a handful of tries. Photographing a waterfall on vacation? Throw on a 10stop ND filter, set your shutter for 30 seconds, and let the water melt into a dreamy streak with the hard rocks sharp behind it. It’s enjoyable to play around with movement once you get the hang of the process.
Things to Keep in Mind Before Heading Out
There are a few gotchas new shooters can avoid with some planning. I’ve fumbled enough to know these are worth mentioning upfront:
- Weather and Light: Long exposures in windy spots can bring shake, and bright sun often needs extra dark ND filters. Early morning or twilight often offer beautiful light with fewer technical hurdles.
- Safety and Situational Awareness: Setting up a tripod at night or by water always calls for extra caution. It’s super important not to get so wrapped up in a photo that you forget your surroundings. Note where your feet are and keep one eye on the weather.
- Battery Life: Longer exposures, especially cold nights, can zap batteries much faster than regular shooting. Always bring spares. In colder climates, keep batteries close to your body so they stay warm as well.
- Proper Filter Use: ND filters from different brands or types might create a color cast. Shoot in RAW so you can correct for this in editing if needed. Sometimes it helps to do a custom white balance before adding an ND filter, just to save some editing time later.
- Focus Before Attaching ND Filters: It’s basically impossible to autofocus through a super dark filter, so focus first, switch your lens to manual, then attach the ND filter.
Getting out and messing up a couple of exposures teaches more than any manual. Keep notes on what worked, what flopped, and what you’d do differently next time. Over time, you’ll build up tricks that help you handle tricky lighting or unpredictable weather without missing that perfect shot.
Creative Approaches and Inspiration
Once you know how to pull off a basic long exposure, it’s wide open for experimenting. Anything that moves relative to still things in the scene is fair game for creative blur.
- Seascapes and Waterfalls: From gentle foggy water to wild milky rapids, it all depends on your shutter speed choice. Try shooting waves at 1 second, then ramp to 30 seconds and check out the difference. Applying long exposures to seascapes can turn choppy water into a peaceful mist surrounding jagged rocks, while capturing the same waterfall at different shutter speeds results in totally unique effects each time.
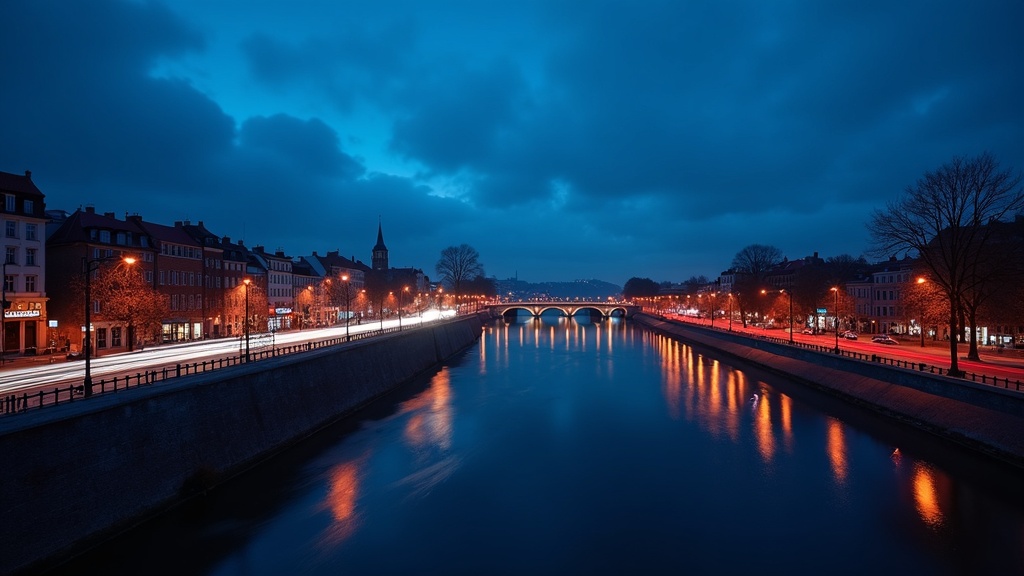
- Cityscapes and Light Trails: Bridges, roads, and tall buildings glow with neon and headlight streaks after dark. Finding a slightly higher viewpoint creates cool trails through the city. Try shooting at dusk for more vivid sky color, and experiment with including moving pedestrians or reflections for extra flare.
- Cloud Movement: Dramatic clouds on a windy day smear across the sky in longer shots. A 10stop ND filter lets you shoot midday and grab that motion without blowing highlights. Shooting with wide lenses can make the drifting clouds seem even more dynamic, pulling your eye through the photo.
- Astro and Star Trails: With the right location and a tripod, open the shutter for 10 minutes or do a series of 30second shots and stack them in editing software to see the stars paint lines in the sky. Apps for tracking stars can help you set up so you catch the longest, most interesting arcs. Remember to bring a flashlight for safer setup.
- Minimalist Scenes: A pier, lone rock, or tree surrounded by moving water or mist looks otherworldly when the movement smooths out and only the solid object remains. Minimalist photos are great for wall art or print projects, as they often evoke a peaceful mood.
The creativity only stops when you run out of ideas. Browse photography sites and apps for inspiration, or try recreating shots you like. Your own style will come with regular practice and experimenting with new places, weather, and times of day. Share your work with photography communities and pick up tips from others’ feedback, helping you keep stepping up your technique.
Frequently Asked Questions
Here are some answers to questions that pop up a lot when folks are getting into long exposure photography:
Question: Do I need expensive gear to start?
Answer: Not at all. Any camera with basic manual controls and a sturdy tripod will get the job done. Accessories help, but you can try long exposures with what you already have. Photographers at all levels have gotten eye-catching results from starter kits and built up as they became more experienced.
Question: Why do my images look washed out?
Answer: This usually means too much light is hitting the sensor. Try a darker ND filter, close down the aperture, or shoot earlier or later in the day when it’s less bright. Shooting in RAW mode gives you more flexibility to bring back highlights in post-processing.
Question: How do I avoid blurry photos?
Answer: Vibration or subject movement outside your creative plan is usually the culprit. Use a good tripod, a remote or timer, and avoid setting up in very windy spots. If wind is unavoidable, try hanging your camera bag from the tripod for extra stability.
Question: Do I always need an ND filter?
Answer: No. At night or in dark conditions, you can easily shoot long exposures without a filter. They’re mainly helpful for shooting in light you can’t control, like daylight. For night skies and star trails, ditching the filter is usually best.
Getting the Most Out of Your Long Exposures
Long exposure photography is one of those techniques that’s just plain fun, whether you’re into landscapes, cityscapes, or minimalist scenes. It rewards curiosity and patience, and even simple mistakes can turn into something creative with a little editing. All you really need are manual control, a stable setup, and curiosity about what a scene could look like if you stretched time just a bit.
Don’t be afraid of fiddling with settings or heading back out to shoot the same place multiple times. You’ll learn fresh tricks every time, and you’ll start to notice new ways to catch movement and time in your photos. Practice, share your shots, and see where your own experiments take you. There’s a lot of magic hiding just past that first click of the shutter, and each long exposure could help you stumble upon your next favorite image.